
تدوينة اليوم عن زر أخر مستعمل بكثرة في كثيرا من البرامج وهو من أزرار القيم المنطقية إي أن لديه حالتين فقط
RadioButton عبارة عن زر ضغط لتنفيذ بعض الاوامر البرمجية المحددة ,وهو يستعمل داخل مجموعة ازرار الراديو والتي تسمي RadioGroup وهو عبارة عن مجموعة تحتوي علي أزرار RadioButton ويمكنك وضع العدد الذي تريد داخل هذه المجموعة
العملية التي تتم عند الضغط علي أحد الازرار هي أنه سيتم إلقاء تحديد جميع الازرار الاخري ,وهذا يعني أنه يمكن الضغط علي زر واحد فقط من مجموعة الازرار التي تنتمي الي نفس المجموعة RadioGroup.
RadioGroup عبارة عن أداة مستخدمة في Android لتجميع أزرار الاختيار وتوفر ميزة تحديد زر راديو واحد فقط من المجموعة. عندما يحاول المستخدم تحديد أي زر راديو آخر داخل نفس مجموعة الراديو ، فسيتم إلغاء تحديد زر الاختيار المحدد مسبقًا تلقائيًا.
قم بعمل خطوات مشروع جديد وتسميته بما تريد وفي داخل ملف XML الخاص بالصفحة الرئيسية قم بكتابة الكود التالي وهو الشكل الاساسي لزر RadioButton.
 <RadioGroup
        android:layout_width="wrap_content"
        android:layout_height="match_parent">

        <RadioButton
            android:layout_width="wrap_content"
            android:layout_height="wrap_content" />

        <RadioButton
            android:layout_width="wrap_content"
            android:layout_height="wrap_content" />
    </RadioGroup>

خصائص زر RadioButton
هي نفس الخصائص التي تعرفنا اليها سابقا في ازرار التبديل Switch & ToggleButton| إسم العامل | إستخدامه |
|---|---|
| id | خاصية إعطاء الزر إسم فريد لا يشترك فيه زر أخر ويسخدم هذا الاسم في ملف الجافا عندما نريد إعطاء بعض الاوامر لهذا الزر |
| Checked | يتم استخدامه لتحديدالحالة الحالية لزر الاختيار. يمكننا تعيينها إما صواب أو خطأ حيث يظهر true الحالة المحددة checked والخطأ false يعرض حالة غير محددة unchecked من زر الاختيار. كالقيمة الافتراضية المعتادة للسمة المحددة false |
| text | توفر إمكانية كتابة نص ما داخل الزر android:text="stringValue" |
| gravity | خاصية محازاة النص داخل الزر وفقا للاتجاهات مثل right, left, bottom, center |
| textColor | خاصية إعطاء النص داخل الزر لون محدد android:textColor="#fff" |
| textSize | خاصية تعين حجم للنص وتقاس بوحدة sp android:textSize="20sp" |
| textStyle | تعين شكل النص داخل الزر وتأخذ القيم bold or itlaic |
| background | تعين لون او صورة لتكون خلفية للزر |
| padding | تحدد المسافة بين النص وحواف الزر من الجهة الداخلية وتأخذ قيم متجهية مثل right left top bottom وتكون قيمة الخاصية عددية اي رقم يمثل المسافة android:paddingLeft="20dp" |
| drawableValue | خاصية تعين صورة بجانب علامة الزر الثابتة وفقا للاتجاه المحدد android:drawbleRight="مكان تواجد الصورة" |
<LinearLayout xmlns:android="http://schemas.android.com/apk/res/android"
    xmlns:tools="http://schemas.android.com/tools"
    android:layout_width="match_parent"
    android:layout_height="match_parent"
    android:orientation="vertical"
    tools:context=".MainActivity">

    <RadioGroup
        android:layout_marginTop="20dp"
        android:layout_gravity="center"
        android:layout_width="wrap_content"
        android:layout_height="wrap_content">

        <RadioButton
            android:id="@+id/btn_click"
            android:text="radioButton1"
            android:textSize="20sp"
            android:textColor="#e11596"
            android:checked="true"
            android:background="@color/colorPrimary"
            android:gravity="top"
            android:padding="10dp"
            android:drawableRight="@drawable/ic_android_black_24dp"
            android:layout_width="300dp"
            android:layout_height="100dp" />
    </RadioGroup>

</LinearLayout>

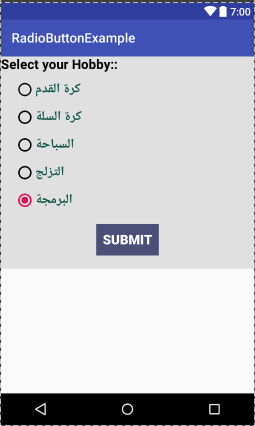
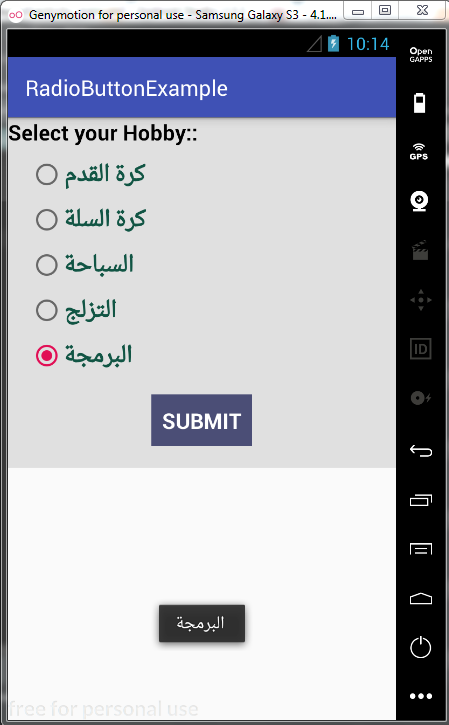
سنقوم بعمل مثال شامل لتوضيح فكرة عمل أزرار الاختيار وكيفية برمجتها في ملف الجافا
قم بفتح ملف xml واكتب داخله الكود الاتي
<LinearLayout xmlns:android="http://schemas.android.com/apk/res/android"
    xmlns:tools="http://schemas.android.com/tools"
    android:layout_width="match_parent"
    android:layout_height="match_parent"
    android:orientation="vertical"
    tools:context=".MainActivity">

    <LinearLayout
        android:layout_width="fill_parent"
        android:layout_height="wrap_content"
        android:background="#e0e0e0"
        android:orientation="vertical">

        <TextView
            android:layout_width="wrap_content"
            android:layout_height="wrap_content"
            android:text="Select your Hobby:: "
            android:textColor="#000"
            android:textSize="20sp"
            android:textStyle="bold" />

        <RadioGroup
            android:layout_width="wrap_content"
            android:layout_height="wrap_content">

            <RadioButton
                android:id="@+id/btn_football"
                android:layout_width="wrap_content"
                android:layout_height="wrap_content"
                android:layout_marginLeft="20dp"
                android:layout_marginTop="10dp"
                android:checked="false"
                android:text="كرة القدم"
                android:textColor="#154"
                android:textSize="20sp"
                android:textStyle="bold" />

            <RadioButton
                android:id="@+id/btn_basketball"
                android:layout_width="wrap_content"
                android:layout_height="wrap_content"
                android:layout_marginLeft="20dp"
                android:layout_marginTop="10dp"
                android:checked="false"
                android:text="كرة السلة"
                android:textColor="#154"
                android:textSize="20sp"
                android:textStyle="bold" />

            <RadioButton
                android:id="@+id/btn_swimming"
                android:layout_width="wrap_content"
                android:layout_height="wrap_content"
                android:layout_marginLeft="20dp"
                android:layout_marginTop="10dp"
                android:checked="false"
                android:text="السباحة"
                android:textColor="#154"
                android:textSize="20sp"
                android:textStyle="bold" />

            <RadioButton
                android:id="@+id/btn_running"
                android:layout_width="wrap_content"
                android:layout_height="wrap_content"
                android:layout_marginLeft="20dp"
                android:layout_marginTop="10dp"
                android:checked="false"
                android:text="المشي"
                android:textColor="#154"
                android:textSize="20sp"
                android:textStyle="bold" />


            <RadioButton
                android:id="@+id/btn_programming"
                android:layout_width="wrap_content"
                android:layout_height="wrap_content"
                android:layout_marginLeft="20dp"
                android:layout_marginTop="10dp"
                android:checked="true"
                android:text="البرمجة"
                android:textColor="#154"
                android:textSize="20sp"
                android:textStyle="bold" />

        </RadioGroup>

        <Button
            android:id="@+id/submitButton"
            android:layout_width="wrap_content"
            android:layout_height="wrap_content"
            android:layout_gravity="center"
            android:layout_margin="20dp"
            android:background="#0f0"
            android:padding="10dp"
            android:text="Submit"
            android:textColor="#fff"
            android:textSize="20sp"
            android:textStyle="bold" />
    </LinearLayout>

</LinearLayout>
package engahmed.gagacademy;

import android.support.v7.app.AppCompatActivity;
import android.os.Bundle;
import android.view.View;
import android.widget.Button;
import android.widget.RadioButton;
import android.widget.Toast;

public class MainActivity extends AppCompatActivity {
    RadioButton football, basketball, swimming, running, programming;
    String selected;
    Button submit;

    @Override
    protected void onCreate(Bundle savedInstanceState) {
        super.onCreate(savedInstanceState);
        setContentView(R.layout.activity_main);
        football = (RadioButton) findViewById(R.id.btn_football);
        basketball = (RadioButton) findViewById(R.id.btn_basketball);
        swimming = (RadioButton) findViewById(R.id.btn_swimming);
        running = (RadioButton) findViewById(R.id.btn_running);
        programming = (RadioButton) findViewById(R.id.btn_programming);
        submit = (Button) findViewById(R.id.submitButton);
        submit.setOnClickListener(new View.OnClickListener() {
            @Override
            public void onClick(View view) {
                if (football.isChecked()) {
                    selected = football.getText().toString();
                } else if (basketball.isChecked()) {
                    selected = basketball.getText().toString();
                } else if (swimming.isChecked()) {
                    selected = swimming.getText().toString();
                } else if (running.isChecked()) {
                    selected = running.getText().toString();
                } else if (programming.isChecked()) {
                    selected = programming.getText().toString();
                }
                Toast.makeText(getApplicationContext(), selected, Toast.LENGTH_LONG).show();
            }
        });

    }
}


ليست هناك تعليقات:
إرسال تعليق
ملحوظة: يمكن لأعضاء المدونة فقط إرسال تعليق.